Capturando um menu de nível múltiplo
Sometimes capturing pop-up items such as multi-level menus or button tool tips can be tricky. Often when a capture is initiated the menu or pop-up will disappear. Solid Capture provides a work-around solution so that you can easily save screen shots of these items. Step 1
- Open Solid Capture
Open Solid Capture using one of the following methods:
- Desktop
. Double-click on the Solid Capture icon.
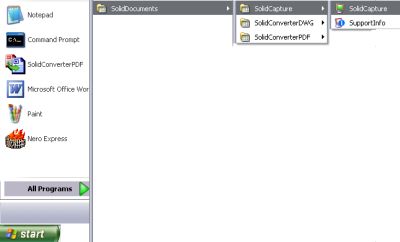
 - Windows Start menu. From your Microsoft Windows Start Programs menu, select Solid Documents|Solid Capture|Solid Capture.
Tip: If desired, you can add Solid Capture to your start-up group. After Windows is started, Solid Capture will become active and the icon will display in your system tray. Step 2
- Display Pop-Up Items
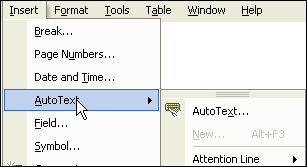
Display the pop-up items on the screen. In this example, we are displaying a menu from Microsoft® Word.
Step 3
- Use the Shortcut Key to Initiate Capture
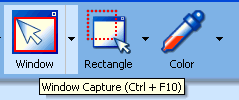
Use the shortcut keys to launch the window capture function - in this instance, we are using CTRL + F10 (default window capture) to start the capture. (Note that you CANNOT use a toolbar button for this purpose; you must initiate the command with the hotkeys.)
Tip: If you do not remember what your hotkeys are, either scroll your mouse over a toolbar button or click the Options button in the main toolbar and select the Shortcuts tab to view a list of hotkeys. Step 4
- Select Menu Parts While Holding Shift Key
Holding down the Shift key, select each part of the menu you want to capture by clicking it with the mouse. The menu parts will be highlighted and shaded as you click.

Step 5
- Save Your Window Capture
Once you have selected each portion of the popup menu that you would like to capture, one more click of the mouse (this time without the Shift key) will finish the capture function. Note: The last mouse click will not make a new selection. It will simply conclude the capture session. Depending upon your settings, Solid Capture will do one or more of the following:
- Save the capture to a file. When the Browse window opens, navigate to the folder in which you want to save the capture, name the file, and click Save.
- Save the capture to your Windows clipboard. You can then paste the capture in another application such as Microsoft Word.
- Display the capture in your graphics editor. If desired, you can make changes to the capture and save it in the format of your choice.
Note: You can change your capture settings at any time by clicking the Options button in the main toolbar.
| 